Removing Tough Winter Salt Stains

removing salt stains from vehicle exterior

There is no doubt about it, the cold, snowy winter months can wreak havoc on your home.

Some of the biggest problems that we have to face throughout the winter are the salt stains that coat our cars and boots.

Whether you are out shoveling your driveway or on your way to work, it is inevitable that you will get snow – and salt – on your footwear and vehicle on a daily basis during the winter season.

Luckily, SpongeOutlet has a few cleaning tricks to help keep them looking fresh and new until the weather warms up!

Cleaning Vehicles of Salt

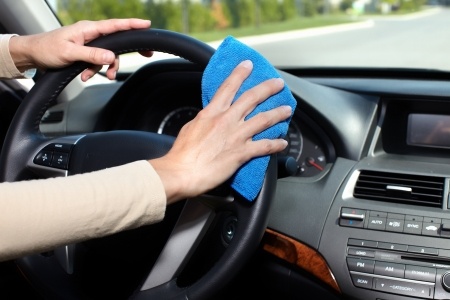
The salt stains that coat your vehicle aren’t just an unattractive nuisance; they can actually do a lot of damage to your paint job.

This half and half cleaning solution is gentle on your vehicle’s paint but tough on salt and the microfiber towel will keep any scratches from occurring as you wipe the car down.

Removing Salt from Footwear

While waterproofing your boots will keep them from getting wet throughout the winter months, it is hard to keep them salt free.

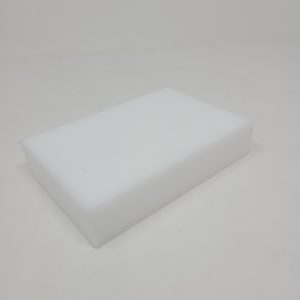
There are a few different techniques for de-salting footwear, but the Eraser Sponge is the easiest one.

These sponges are tough on dirt without leaving behind residue that will harm your shoes. They can be used on nearly any surface as well, making them perfect for cleaning up the salt stains that end up on your floors after the kids track snow in!

To keep your home, vehicle and winter gear clean all season long, visit SpongeOutlet to purchase your cleaning supplies.

Have a question?

Give us a call at 877-776-6430.

Tips for Cleaning Your Home for the Holidays

Now that December is here, your family is probably busy hanging decorations around the home, wrapping presents and preparing for guests to visit. Throughout this month, there is a lot of extra cleaning to do to and whether you are readying the guest room or wiping up the kitchen after making Christmas cookies, SpongeOutlet is here to help. Check out our holiday cleaning tips for an enjoyable and sparkly clean winter with your loved ones.

Do A Little Bit Every Day

Instead of panicking in the days leading up to your big holiday party, do a little bit of cleaning each day of the month to get your house ready for the holiday season. This way, you can just touch up areas like the bathroom and the living room on the morning of the festivities. Especially if you have a live tree or one covered in tinsel, we recommend quickly sweeping or vacuuming every evening to keep needles and sparkly strands of foil from ending up all over your home. This way, when it comes time to celebrate with your family and friends, you will be able to relax and enjoy your time together!

Brighten Walls and Surfaces

Looking to make every surface of your home sparkle and shine this holiday season? We recommend focusing on your walls, floors and countertops. The Eraser Sponge is perfect for cleaning scuffs and marks off of walls without compromising paint. It can also clean the toughest dirt and grime from your counters with ease, leaving you with plenty of time to build a snowman and bake your favorite holiday recipes.

Pay Special Attention to the Entryway

Make a great first impression this winter by sprucing up your entryway for guests. Organize coats and boots, scrub the walls with your Eraser Sponge and add a few holiday decorations to spread a little cheer. With a clean, cozy entryway, your loved ones are sure to feel welcome as they make their way in from the cold.

Visit SpongeOutlet to put in your Erase Sponge order today. Strong enough to use on nearly any grit, grime and dirt, the Eraser Sponge can be used anywhere without leaving a hazardous residue or chemical odor behind. For more information on our high-quality products, contact SpongeOutlet online or by calling 877-776-6430.

How To Make Cleaning Your Outdoor Patio Furniture Easier

clean patio furniture

Your home has been the hot spot for all the cool, entertaining parties this year.

With a big pool, large backyard deck, grass for activities, fancy grill and lots of friends to enjoy in the fun – you’ve had a successfully enjoyable summer. Lots of time has been spent in the backyard and if the chairs could talk, they would have quite the story to tell!

With all the parties and days out in the elements, your tables, chairs, and décor have seen better days. As the winter weather draws near, it is time to pack away your outdoor patio furniture.

Before you do, take some time to clean it up.

This way, when it is time for the outdoor fun to begin again next summer, your furniture will be ready to celebrate the sun’s reappearance too.

Don’t forget to clean a small inconspicuous area first before moving onto a larger one. Wipe those chairs clean of the grime accumulated from being outside all summer, and those patio tables from the spilled food and sediments splashed all over.

Visit SpongeOutlet to put in your order for Eraser Sponges today. These sponges are strong enough to use on nearly any grit, grime or dirt you can think of, without compromising any type of surface. The Eraser Sponge can be used anywhere and leaves no hazardous residue or chemical odor behind. For more information on the Eraser Sponge or any of the high-quality products we offer, contact us online or by calling 877-776-6430.

A Guide for Cleaning Your Basement

Basements are notorious for being dark, damp, and sometimes even a little spooky.

But if you clean them up and organize them, you might find they aren’t quite so bad.

Here are some of the things that you will need to clean a basement:

  • Sponges- 1 regular sponge & 1 eraser sponge handy
  • White Vinegar
  • A Soft cloth
  • Dish-washing liquid
  • Bucket
  • Ammonia
  • Drop-Cloths
  • Rubbing Alcohol
  • Tools like vacuum, broom, dustpan, mop
  • Baking soda
  • Batteries
  • Clay cat litter and pan

Begin cleaning the basement by gathering up your materials and keeping them in one place.

Consider listening to some music while you work.

dirty basementThe first thing you should do is tackle anything that was covered up with dust covers.

Take them outside to get rid of the dust, and then throw them in the washing machine. Wipe down any items that were covered.

Next, wipe down the outside of the furnace and the hot water heater with either sudsy water or equal parts water and vinegar.

  • If you want to make sure that all of the dirt and debris are off, however, we suggest using an Eraser Sponge.

Then, mix together a gallon of warm water, a cup of ammonia, and a teaspoon of mild dish soap.

  • Put down a drop cloth near one of the walls and clean them using the mixture you just created.
  • If you happen to find mold, clean it with hot soapy water. Make sure it is thoroughly dried afterward! Do this to all the walls.

Once you have done that, clean the windows.

  • If you don’t wish to use a window cleaner, you can use a mix of 1 pint rubbing alcohol, 2 tablespoons ammonia, and 2 tablespoons of dish soap. Then, wash the windows.
  • Rinse them and buff them dry.

Next, move your attention to the floors.

  • You can use baking soda on hard floors and carpets. This will neutralize odors.
  • Once the area is covered, you can sweep it/vacuum it up, and then throw it out.

While you have your vacuum out, take a moment to gently vacuum the smoke detectors and get rid of any dust that might be on it.

  • This layer of dust could affect their sensitivity and how well they work.

To make your floors shine, mop them.

  • If you really want to detail clean it, scrub it by hand, starting on the outside of the wall going in toward the center of the room in small, circular patterns.
  • This is also an excellent time to use an Eraser Sponge!

What valuable tips have we left out? What do you do in order to clean your basement?

Eraser Sponges: Room by Room Cleaning

cleaning your homeCleaning your home can be fun and rewarding again!

Using an Eraser Sponge, you can clean and see results immediately.

We have compiled a room-by-room cleaning list for areas you may want to use your next shipment of eraser sponges on:

Kitchen

  • Set in tea and coffee Stains on mugs, pots and maybe even counter tops
  • Small nooks and crannies of small electronics such as can opener or hood of stove
  • Microwave inside and out
  • Grout of backsplash or tiled flooring
  • Refrigerator handles and doors
  • Remove cooked on stains of pots and pans

Living Space

  • Baseboards or floors of scuff marks or stuck on grime
  • Coasters and end tables
  • Dried paint from door hinges

Bathroom

  • Build up of mildew, hair care products, and toothpaste from sinks, cabinets, floors, and tubs
  • Rust and corrosion of pipes under sink
  • Remove stains on toilet seats and in toilet bowls
  • Nail polish spills or stains
  • Hair dye stains
  • Bathroom mirrors

Bedrooms

  • Scuff on walls and baseboards
  • Carpet stains
  • Stuck on grime and stains of dressers
  • Removes adhesive from stuck on stickers
  • Clean doll faces

Outside

  • Clean pool steps before storing for the winter
  • Clean plastic coolers inside and out
  • Clean lawn ornaments from the weathering of leaves and mildew
  • Shelves and grates of grill
  • Green algae on bird baths, sidewalks or other cement items
  • Clean boats and outdoor furniture
  • Bicycle including tires and handle bars
  • Inside your car including dash and steering wheels
  • Brake dust on car rims
  • Soap scum and oils from hot tub
  • Bugs on windshield and grill
  • Small scratches on car


Unique Uses for Eraser Sponges

Melamine Eraser Sponge
We have yet even more unique uses for your Eraser Sponge!

  • Clean Cell Phones and iPods
    • Because eraser sponges don’t require much liquid you can safely clean your iPod and cell phones.
    • Place a small piece of sponge in water then squeeze all excess liquid off and gently rub to remove smudges or dirt spots.
  • Scuffmarks on Cars
    • If you accidentally hit something in the driveway don’t run off to the body shop before your spouse gets home. Use an eraser sponge to clean the small scuffmark away.
  • Food Stains on Clothes
    • Place a towel under clothes and use dampened eraser sponge to gently blot away stains!
  • Leather Upholstery
    • Place the whole eraser sponge in water, squeeze all excess water then gently rub leather. Test an inconspicuous area first to ensure your leather will not adversely react.
  • Tea Stains
    • Clean your favorite teapot or tea cup with eraser sponge to make it shine like new.
  • Computers
    • Use the eraser sponge to clean your computer monitor, keyboard and mouse. These items buildup with grime from hands and can carry bacteria.
    • Keyboards are known to have more bacteria than handles or toilet seats.
  • Tarnish From Silver
    • Rub tarnished areas with the eraser sponge, then thoroughly wash and dry it to have a shiny new silver finish
  • Bugs From Car
    • Use the eraser sponge on the grill, windshield and bumper to clean on stuck on bugs from your last road trip to the country. Please note that you should test in an inconspicuous area first!
  • Steering Wheel
    • While you are cleaning the car open the door and clean off the steering wheel with your eraser sponge.

Make Your Painted Walls Spotless!

eraser spongeHave you taken a look at your walls lately?

If not, you might be surprised about what wound up on there.

Here is a simple step by step instruction of how to remove any sort of mess off your walls and make sure they look great!

Step One: Cobwebs

This is a part of cleaning we don’t like to think about, since cobwebs tend to mean spiders are afoot.

However, getting rid of huge clumps of dust, dirt, or lint will make it easier for you to get at the stickier messes.

  • Use a cloth or a vacuum, depending on where the location is.

Step Two: Spot Cleaning Crayon Marks

For those who have kids, crayons can go missing or get used for the wrong purposes. Check to see if you see any crayon marks.

If you do, the first thing you want to do is make sure there are no clumps of it on the wall. Smearing large chunks can make your mess bigger.

Step Three: Spot Cleaning Marker and Ink

This is an accident that anyone in the home can be guilty of. Since this process is slightly different, it should be treated as a separate step.

  • First try spot cleaning with your eraser sponge.
  • If you have a textured wall, the heavy duty version should work better.

However if for some reason this doesn’t work, there are some other tricks to try.

  • If you have hairspray handy, you can spray the stain with it, and then gently rub the wet spot with a paper towel or rag.

This process may have to be repeated more than once. If this doesn’t work either, then covering the stain with plain toothpaste for ten minutes might lift it. Wipe it clean!

Step Four: Removing Beverage Stains

If you have a magic eraser, try this first.

It will save a lot of time and scrubbing. If not, then a mild detergent will be gentle enough to be used on stained walls. You don’t need much, though!

Step Five: Clean What Remains

You might get done treating these individual stains and notice your walls look blotchy now.

Do a gentle but thorough wipe down of your walls to ensure you didn’t miss anything. If you have stubborn grime on your walls, eraser sponges work great for that too!

You will find after all this hard work, your walls will look like new!


Use Eraser Sponges to Help with DIY Crafts!

diy craftToday, we live in a world where we try to recycle and upcycle materials as much as possible.

What does this mean?

It means using old materials to create something new.

If you have ever taken a look at Pinterest, you will see that there are tons of crafts on there that require removing labels from bottles, jars, and other containers.

The problem that most people run into here is that when they remove the label, there is adhesive left behind and everything is sticky.

You really don’t want to try to paint something that had leftover adhesive on it. Not if you want to keep your paintbrush in one piece, at least.

Luckily, Eraser Sponges are great removing adhesive and other materials!

Here are some instances where this might be handy:

  • Removing labels from wine bottles, jars, plastic containers, in order to create something new. This will give you a clean surface to create a masterpiece with.
  • Removing spilled glue from a surface (it’s recommended you use a small piece for this, so you don’t remove anything besides what you’re meaning to remove). It can be tough to judge how much glue you will need, but it can be easily removed if it spills over!
  • Removing marker, crayon and pencil markings from surfaces. Especially with young children, it is a good idea to have cleaning supplies ready.

Regardless of the project that you are working on, messes are bound to happen.

Why not use a product that is going to quickly clean it up with no mess and no odor? Check out Sponge Outlet today!

Clean Your Fridge From Top to Bottom!

fridgeThere are many things in your home that need to be cleaned on a regular basis, but one that can be easily forgotten about is the fridge-particularly the inside of it.

Here is a walk through to help you clean it out using cleaning supplies that are already in your home.

Here is what you will need to clean a fridge:

  • Gloves (optional, but we’re sure you’ll want them)
  • Garbage Can
  • Recycling Container
  • Toothbrush or Small Scrubbing
  • Eraser Sponge
  • Cloths
  • Baking Soda

First, you will want to make sure you take everything out of the fridge.

  • You do not want to have foods anywhere near your cleaning supplies, so you will want to do this at a time where you can stick your perishable items elsewhere.
  • Also, get rid of foods that haven’t been eaten! It’s all too often that food is stuck and the fridge in the back and a science experiment begins!

Next make sure you get rid of any loose food crumbs.

  • This is going to save you time and effort later.

Once you have cleared the way, use your Eraser Sponge to wipe down all the surfaces.

  • And when we say this, we mean really get in the crevices. Take out the drawers and shelves and wipe them down separately. Don’t forget to use your Eraser Sponge on the walls of the fridge and the outside too; these areas get a lot of traffic as well.

If need be, you can use a small toothbrush to get into the hard to reach places.

It is very likely that in the process of cleaning and wiping down, there will be water that pools. It is best to make sure you get this wiped up as well so as to not encourage any build up.

Once the inside of your fridge is all clean, put your (clean) shelves and drawers back where they belong, and also put in a fresh container of baking soda.

  • This will help make your fridge smell better.

Other tips to keep in mind:

  • When putting the foods back in their place, wipe down the containers. Jelly can get sticky awfully quick and make it hard to clean up later. It will also help you not get your hands sticky!
  • Consider putting down shelf liners on the shelves and drawers. These peel off easily and will help keep everything cleaner for longer.
  • On a weekly basis, go through your fridge and get rid of foods you haven’t eaten that are going stale. Do this on garbage night so you don’t get stuck with funky smells.

[msh_feedburner]

Cleaning your Car with an Eraser Sponge

cleaning your carSummer is coming to a close- that means your car has probably been through the ringer.

It is time to clean out all that sand and grime you have accumulated over the summer months while having your summer fun.

The best tool for the car-cleaning job is the eraser sponge.

These things are a miracle for any cleaning situation.

First thing you need to do is make sure to wet the sponge enough to be wet but not soaking and dripping.

Start with your center console and dashboard.

  • These areas can collect a lot of dust in all the little cracks. Get deep in there and you will be sure to see the difference the eraser sponge can make. You can get all the stuck on food and grime your car has accumulated.

Next start cleaning your steering wheel, this is the most touched piece of your car and can accumulated the most germs and grime.

  • You may not even realize the amount of buildup until you go at it with your eraser sponge. Lastly use the sponge on any leather or vinyl. You can watch all the stains disappear before your eyes.

Now that the inside of your car is clean grab a new sponge and clean the outside.

  • Have you been taking the road trips to the country? Then you have TONS of bugs stuck on your windows and grill. Use your eraser sponge to take them off with ease. Yes it is gross but using the sponge will help make it go faster.

You can also use the sponge to clean off all the surfaces on the outside of the vehicle.

  • Even the tires, they may be more of challenge, but nothing is too hard for the eraser sponge.  Take your time and have fun with this!