Tackling Mold on Walls Once and For All

Tackling Mold

Mold is the last thing you want to find inside of your home. Mold can grow in plenty of conditions, so if your home is the right blend of warm and moist, you may be at-risk.

But not to worry. If you have mold, you can get rid of it by taking a few key preventative steps and removing it completely from the areas inside your home that are affected.

Read on to learn about ways to remove mold from walls so  you can avoid replacing the interior of your home!

Step 1: Identify the mold

The first thing you’ll need to do when you suspect that there’s mold in your home is identify what kind of mold you’re dealing with. Some molds can be very detrimental to your health, while others are not so harmful, so it’s important to take the proper precautions.

Mold can grow anywhere, but you’ll most often find a version of it called mildew in your shower tile grout lines, other areas in damp bathrooms, and walls that had recently been wet due to a leak. To see if you’re dealing with mildew, test a small area by placing a few drops of bleach. If the bleach lightens up the dark spots, then you’re dealing with mildew. If it stays black, you probably have something else—like dirt!

Other molds, or mold in a high concentration, will give off a musty odor. If you can smell something funky, but can’t see what you’re dealing with, it might be a good idea to bring in a professional. Mold can be tricky to remove, even in the best of circumstances, and if you can’t see the mold, it’s probably burrowed in your walls.

Black mold is also something that you shouldn’t attempt to remove—let the professionals deal with it.


Removing MoldStep 2: Remove the mold

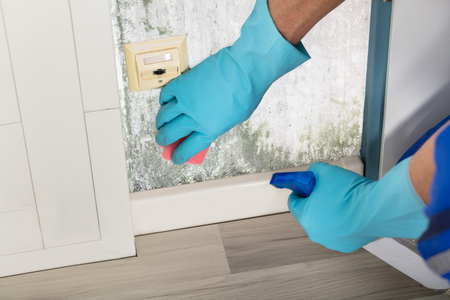
Once you’ve identified that you have an area of your home that needs to be cleaned and rid of mold, you’ll need to gather your supplies. Remove any furniture from the area that needs to be treated, and put on a pair of rubber gloves, goggles and a mask to protect yourself. You’ll also want to wear old clothing that you won’t mind bleaching or tossing when the task is done.

Home Guides says to mix 3 parts warm water to 1 part detergent in a spray bottle. Spray the solution on the moldy areas of the wall, and scrub with a towel. Keep in mind that wire brushes may damage your drywall. Once all areas have been washed, use a clean spray bottle to apply water and wipe the area dry.

Next, mix a solution of 1 part bleach to 2 parts water. Spray the mixture on the affected areas, and let it sit for 10 minutes. Then, rinse with the water-only spray bottle. Dry with a clean cloth or rag, and discard of any used towels or rags in a tightly sealed garbage bag.

If these steps don’t work, or you prefer to not use bleach in your home, you can try to remove the mold with a vinegar mixture.

Spray the mold with vinegar and let it sit for 1-2 hours. Afterwards, mix baking soda and water to form a paste, and use this paste to scrub the affected areas of your wall. Rinse with clean water when you’re finished.

Step 3: Repaint the mold areas

Unfortunately, removing mold can be a bit of a messy business, so chances are you’ll need to re-paint your walls once the mold has been taken care of. The bleach and the scrubbing won’t be kind to your paint job, so plan for a re-paint. If your walls are still dark and stained from the mold, ask your local hardware store about a primer that will cover up those stains.

Step 4: Prevent moldTackling Mold

Antimicrobial sprays can be used to prevent mold in your home. Or, you can pick up an anti-mildew paint from your hardware store.

In areas that are often subject to heat and humidity, consider installing a de-humidifier to pull excess moisture from the air and prevent mold growth. Keep everything as well-ventilated as possible.

Pick up your mold-removal supplies for your home right here at Sponge Outlet. Our microfiber cloths are great for wiping down walls and other affected areas, and our eraser sponges are great for treating tough stains caused my mildew. For more tips and tricks to keep your home clean, head to our blog! Need help placing an order? Call us at 877-776-6430.

Seven Questions to Ask Before Hiring a Cleaning Company

Questions to Ask Cleaning Company

We’ve all been a bit too busy, or tired, or interested in other things to worry about keeping the house clean. When you’re strapped for time, but you still appreciate a sparkling home, bringing in a professional cleaning company is a great way to maintain your sanity and clean the house.

But, you shouldn’t just choose the first cleaning company that you come across online. After all, the people you hire will be spending a lot of time inside your home, and you want to be sure you can trust them. Plus, you want to make sure you’re getting a good deal.

Read on for a few key questions to ask before hiring a cleaning company.

Do you have insurance?

The most important question to ask is whether the cleaning company is bonded and insured. They should carry liability insurance and bond, and have policies to follow for what to do if one of your items is broken or goes missing during a cleaning, according to Angie’s List.

You should also make sure that any potential company that you hire has workers’ compensation insurance and ask to see proof. If a worker is injured in your home, or even while driving on their way to your home, if your cleaning company isn’t properly insured, it could end up costing you.

Keep in mind that your homeowner’s insurance doesn’t typically cover short or long-term disability or workman’s comp from injuries sustained by workers in your home.

If the cleaning company balks at the question, move on. If they are happy to provide the paperwork, and don’t seem surprised that you asked, chances are they’re a reputable company and they have their insurance in order—but definitely look at the paperwork yourself.

How do you determine prices?

Chances are, this will vary from company to company. It’s important to understand how your cleaning company will set rates for your home before you sign on the dotted line. Ask for an estimate for how long it’ll take to have your home cleaned.

If you want to make sure to control costs, ask about capping the number of hours workers can be at your home. And, most companies will charge an hourly rate for the initial visit, and then a flat rate based on that visit after that.

Eraser SpongesDo you use your own cleaning supplies, or do you want me to supply them?

Another hot button issue when it comes to cleaning services is who provides the products. If you have very specific products that you want your cleaning company to use, then they should be able to make that allowance. But, it’s always nice when the cleaning company provides the products themselves. That way, the workers will be properly trained on how to use the products, and you won’t see any damage to your furniture if, for example, someone used the wrong cleaning agent.

Some cleaning companies may offer a few options in terms of which products you’d like them to use. If it’s important for you and your family, ask about non-toxic options.

How do you screen your staff?

Like we said in the intro, the staff at the cleaning company will be trusted with keys to your home, so you want to make sure the people who are working for the cleaning company are screened. Most companies will provide background checks if you ask, and some companies will also do drug screenings of their employees.

What services are included?

Some cleaning services include laundry, while others don’t – you may prefer to ask for deep cleans of windows, baseboards, and bathrooms from your cleaning service, and leave the daily tasks like dishes for yourself. Or, you can request that everything is cleaned. It all depends on your preference, and what the cleaning company offers.

What should I do with my pet?

Ask about what your cleaner is most comfortable with when it comes to your pet. If you won’t be home during the cleanings, introduce your dogs to your cleaner before they clean for the first time, that way your pup won’t be alarmed when your new cleaner lets himself in.

If your cleaner would prefer to clean the home without the dog around, make sure the pup is crated or staying with a friend during the clean.

Cleaning Comany ReviewsCan I see references?

The last thing we recommend you asking is for references: most cleaning companies will have these handy and be happy to send them to you. Customer satisfaction is a great indication of a good service, so if the reviews look really good and honest, chances are you can trust the company.

Stock up on supplies like eraser sponges and microfiber cleaning cloths before your next in-home cleaning by visiting our online store. Click here for special offers and for more cleaning tips and tricks, visit our blog!

Must-Know Dusting Advice

Dusting Tips

Is dusting just about your favorite pastime? Yeah, we didn’t think so. Here at SpongeOutlet, we’re not crazy about it either, but our years of perfecting cleaning methods and products have taught us a thing or two about the right way to clean your home. And, while you may think dusting is as simple as wiping your furniture with a microfiber cloth, we’re here to tell you that you’re skipping a few steps.

Read on to learn about how to dust the most effective way, in our must-know dusting lesson.

Must-Know Dusting Advice: Make a Plan

Start out by making a plan, or map of what you’ll need to dust: if you prefer lists, that works too. The reason we suggest making a plan is that dust is everywhere, and many people skip very dusty spots simply because they get distracted by other dusty spots when they get started.

  • A good rule of thumb is to dust one room at a time, and don’t just think about the surface: your bathroom, for example, may need to have its walls dusted. Moist air from your shower can cause dust to stick to the walls and baseboards with a little more sticking power than in other rooms.

Start at the top and work your way down. If you have a ceiling fan, dust that first. If you have crown molding, dust that second. Then, tackle the walls, then the furniture, and finally give the floors a good sweep. Dusting your room will upset the layers of dust on your floors and furniture, so starting up high ensures that you’re not leaving any misplaced dust behind. A strong finish with a vacuum cleaner is the best.

Must-Know Dusting Advice: Remove Everything

The first thing to do when dusting a room is to remove all of the items on the surfaces of your tables. You’ll be able to easily dust all surfaces and hard to reach areas, but remember: before you bring your stuff back into the room, make sure you give it a thorough dusting. It would be a shame to spend an hour dusting, only to re-deposit a pile of dust on your perfectly clean tabletops!

Microfiber Dusting WandsMust-Know Dusting Advice: Choose your Tools

We already mentioned a vacuum cleaner: utilize the extension tools that came with it, and don’t forget to change the settings for when you switch from carpet to hardwood. It might seem silly, but it actually makes a difference in how much stuff you pick up.

Microfiber dusting wands are a great alternative to chemical dust sprays, but those can be effective if used properly, especially on that expensive antique furniture in your living room.

  • Pro tip: if you’re not sure how best to clean a particular item of furniture, ask your local hardware store or furniture store for advice. There are different rules for different woods, as well as laminate surfaces.

For dust that’s a bit out of hand, use a damp microfiber cloth, like the ones available from SpongeOutlet.

Must-Know Dusting Advice: Get Preventative

According to HGTV, one of the best ways to “dust” your home is to prevent the dust from accumulating in the first place. You can do this by investing in new air filters for your air conditioner and heating systems.

  • If you’re really anti-dust, you can get rid of your carpeting and opt instead for washable throw rugs. Carpet tends to trap dust, and even when it’s been properly vacuumed, it often has a bit left behind.

Decluttering your surfaces is another great way to make dusting easier: without all of those pesky nooks and crannies to tend to, dusting will be easier and more efficient, costing you less time on your weekly chore list.

Must-Know Dusting Advice: Dry to Wet

If you have hardwood or tile floors, you may be inclined to mop them regularly, but it’s important to dust them first. Use a dry mop or broom to sweep away any dust that’s on your floors, because once you turn on the water, the dust will clump and become more difficult to remove.

  • So, a good rule of thumb: always start with a dry mop, and then switch to a wet one. The same applies when you’re dusting vanities or sinks in your kitchen and bathroom.

Importance of Frequent Cleaning Must-Know Dusting Advice: Frequent Repeats

Now that you have a plan of action, the key to keeping a dust free home is to dust it frequently. You don’t have to make it an everyday chore, but at least once a week is a good rule of thumb. For households with a lot of pets and people, you may need to double or triple up.

For more cleaning tips, check out our blog, and learn about all of our products here. Happy dusting!

What to Clean Before Brining Your New Baby Home

Cleaning Tips for Newborn Baby

There’s no doubt about it, preparing your home for a new baby is a huge feat. You need to stock up on supplies, baby-proof areas like sockets and sharp corners, paint the nursery and that’s not even counting the ways you’ll need to mentally prepare!

One thing that new-moms-to-be are liable to forget about in the stress and excitement of having a new baby is cleaning the home. Bringing a new baby into your house is a great reason to do a little spring cleaning, no matter what time of year it is. You don’t want built up dust and grime bothering your newborn; plus, you’ll probably have a ton of visitors in the next few months, and visitors usually bring their germs with them.

If you’re not sure where to start when it’s time to start cleaning your home in preparation for baby, here’s a list for you and your partner to tackle together.

Clean the Crib & Changing Table Before Baby Arrives

Even if you just purchased your baby’s bedroom furniture, it will need to be cleaned before the baby comes home. The warehouse or shop where the furniture was built or  sold probably was not the most sanitary space,  so make sure to disinfect all surfaces.

If your items are hand-me-downs, use an eraser sponge to remove stickers, crayon marks, and other general wear and tear that may show on the furniture.

Clean the Nursery Curtains Before Bringing Baby home

If your nursery has curtains hung on the windows, take them down and wash them before baby arrives. Curtains are notorious for holding dust build-up, so if you’re making some cosmetic updates to the room, go with blinds instead. They’re easier to clean, and won’t hold as much dust.

What to Clean Before Brining Your New Baby Home 
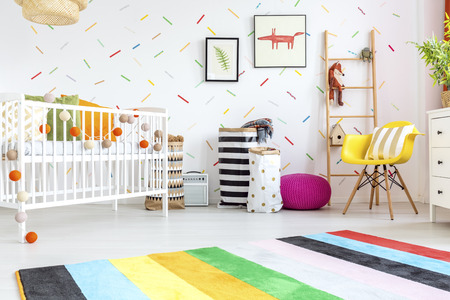
Clean the Car Before Taking Your Baby Home

Head to the garage for your next cleaning task: Give your car a good cleaning on the interior before you drive baby home from the hospital. Build up on the door handles and steering wheel can transfer from your hands onto your newborn, and since they hardly have an immune system yet, you don’t want to risk them getting sick!

Use our microfiber cloths and disinfectant spray on all parts of the car’s interior (and exterior, like door handles) that you touch on a regular drive. And, while you’re at it, make sure baby’s car seat handles are disinfected, and if you can remove the padding for baby’s seat, toss it in the wash.

Clean the Carpets Before Bringing Baby Home

Carpeting is another notorious item for storing dust and mildew. Check out a non-toxic cleaning service. It may not smell as lemon-y fresh, but it’ll clean your carpets without leaving behind chemicals that can be harmful to your baby.

Clean the Kitchen Before Bringing Your Baby Home

Baby food prep, whether you’re breastfeeding or not, will most likely happen in the kitchen—those bottles of breastmilk won’t warm themselves up, after all. Make sure you do a deep clean of your kitchen, including all surfaces, the sink, and the inside of your appliances, including the fridge and the microwave. Anything that you do in the kitchen (like marinating cubes of raw chicken) could come in contact with a baby food item or your formula. Take precautions once baby arrives, but a deep-clean prior to that day will make you worry less.

What to Clean Before Brining Your New Baby Home Clean all Linens Before Baby Arrives

Don’t just open a fresh set of sheets for the crib and throw them on: make sure to machine wash them with soap that’s safe for baby. You should do the same for your bedding, too, including your comforter and any throw pillows that you have hanging around. Chances are, you and baby will be spending quite a bit of time napping in your bed, so cleaning the crib is only half the battle.

Preparing to bring home baby doesn’t have to be a scary process. If you make a list of all the items you need to clean prior to leaving for the hospital, then you and your partner can cross everything off in a couple of days.

Once baby arrives, don’t forget to work these disinfecting practices into your regular cleaning routine: wiping down surfaces with disinfecting wipes will keep your baby from being exposed to potentially germs! And tools like microfiber clothes and eraser sponges can help make your cleaning routine easier to deal with.

For more information on how to stay clean after baby comes home, click here to read our post about how eraser sponges will make cleaning a breeze for any mom.

Ways To Naturally Clean Windows

Today, there is no reason to clean you windows with harsh sprays and chemicals.

Your home can be filled with crystal-clear windows without also filling your house with the strong long-last odors that strong cleaners often leave behind.


Here are two great ways to clean the windows in your home:

       1. A Microfiber Cloth.

A lint-free damp microfiber cloth is chemical-free, easy to use, and very inexpensive. It is also reusable, and it’s easy to clean the microfiber cloth itself. All you have to do to clean the cloth is wet it and then wring it out.

Using a microfiber cloth instead of paper towels is also better for the environment and your wallet. Like a chamois cloth, a microfiber cloth cleans so well on its own, with the help of just a little water, no cleaners are necessary.

Microfiber cloths not only clean your windows, but they also dust and polish them, to help give them a brilliant shine, naturally.

Most microfiber and chamois cloths can be used for more than just cleaning your windows. Additional cleaning uses include: counters, stovetops, tubs, sinks and showers

       2. A Chamois Cloth

A chamois, which is pronounced sham-wa, is the perfect choice for dusty, but not dirty, windows. All you need to is dampen the chamois with just a little water and voila, your window will wipe the dust off effortlessly, without any harsh chemical left from sprays or cleaners.

A chamois is a synthetic cloth best known for its use of drying cars.

Many people do not realize that is also perfect for cleaning the windows in your house, office or car. After cleaning your windows with a chamois, soak the cloth for a few minutes in warm water and soap, then rinse it clean and hang it to dry in your home, away from sunlight.

It is not machine-washable.