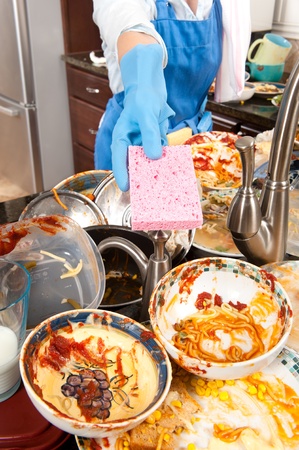
Keep Your Cleaning Products Clean

Holiday Cleaning Tips

We’ve all looked down at the brown broom or sponge in our hand at some point and thought, “Wow, this has to be cleaned or replaced.”

Often times, our cleaning tools that we use are dirty themselves and they also need to be cleaned and up kept.

Below, we talk about the best ways to keep your mops, sponges and other cleaning appliances clean and germ-free.

Brooms and Mops

You should actually be regularly cleaning your broom: shake and beat it outside once a week to get rid of built up dust. You should also wash it with warm, soapy water at least once a month, and consider keeping one broom outside and one broom inside, to limit the transfer of unnecessary dirt.

You should also wash and sanitize your mop head often, but it does depend on usage; most mop heads are machine washable now. Toss your mop head right into the washer with detergent and a bit of bleach.

The Dishwasher

The dishwasher can build up germs, and even mold, if it’s not cleaned and thoroughly dried frequently. Do you usually run it every day? That could mean that your dishwasher is never truly dry which makes it a risk for mold growth. Leave this dishwasher open when a cycle is finished so that the dishwasher and the dishes can completely dry.

Every few weeks, wipe down the racks and the walls of the dishwasher with a cloth dampened with white vinegar. Pour a cup of vinegar into a glass, place it on the top rack, and run the dishwasher at the hottest cycle.

Sponges

Sponges should be thoroughly rinsed and wrung out after each use. You should also be regularly replacing your sponges as well, in order to eliminate spreading bacteria.

Visit Spongeoutlet to view our sponges as well as a variety of our other cleaning products.

Fill Your Summer with Sponges

Summer Sponge Crafts

With summer right around the corner and the school year wrapping up,, it’s going to be important to keep children busy and cool in upcoming months.

While sponges are best used to help with cleaning up messes, they can also be used as a reusable and creative activity for kids.

Hosting a Sponge Relay Race

Forget the complicated activity; let’s grab two large bowls, one sponge (or two depending on how many kids are involved – the more children, the better) and some cool water.

Step 1: If preschoolers or kindergarteners are involved, measure out how many cups of water it takes to fill your bowl to make bowls about ½ to ¾ full. Draw out a simple table on a scrap sheet of paper. Include a “before” and an “after” column, with one row labeled “cups of water.” If it takes eight cups of water to fill the bowl, write eight under the “before” column. By doing so, you’re adding a unique cognitive dimension to this fun-filled activity.

Step 2: Take all of the needed materials outside and place the two bowls a good distance apart.

Step 3: Have your child soak the sponge in the water and run to the other bowl as fast as they can. If there are several children, create two teams and have the team’s race against one another.

Step 4: Encourage the children to squeeze the water out of the sponge and into the second bowl. This entices fine motor practice as well, which helps children better perform crucial tasks such as grasping, writing, and moving.

Step 5: After all of the water is gone from the first bowl, you should measure the water left in the second bowl and record it onto the table that you created in the beginning.

Step 6: Explain to the children why there isn’t as much water in the second bowl. Perhaps it dripped while they were running or some of the water was left in the sponge. This discussion helps children to learn cause-and-effect.

This DIY craft was originally posted on One Time Through.

This simple activity is fun and allows children to learn while keeping cool this summer. In need of some cleaning supplies to get through a summer with the kids home? Visit Spongeoutlet.

Effectively Cleaning a Child’s Bedroom

Let’s face it. Kids can be pretty messy creatures when it comes down to it, which is why it’s even more vital that parents effectively clean their child’s bedroom.

In order to make sure your children is living in a clean space, you must give the room a thorough cleanse from top to bottom.

The idea of tackling this chore may seem tasking, but it’s a necessary evil. And it doesn’t have to be that bad. We’ve compiled some advice to help make it less overwhelming.

Here are some tips on effectively cleaning your child’s bedroom:

Scrub the Walls

A child’s bedroom walls are sometimes one of the most challenging tasks on your chore list to tackle. With any combination of crayon, pen, dirt, food and who knows what else, walls can be particularly challenging to clean. To tackle these tough spots, try using a microfiber cloth with water and a smidge of baking soda, or opt for one of Spongeoutlet’s eraser sponges, which make getting tough stains out easy.

Don’t Forget the Furniture

It can be easy to overlook that bedroom furniture needs some cleaning love, too. However, this is a key area not to pass up as your child touches the furniture often. For simple dusting, a microfiber cloth will do the trick. For tougher spots, an eraser sponge will be your go-to best bet – just be mindful to not harm the furniture’s material.

Spotlight on Bedding

Give your child’s bed a refresh by washing the bedding every two weeks. But the bedding isn’t the only part of your child’s bed that needs to be cleaned. Don’t forget to also give the bed’s frame a good wipe down as well using a microfiber cloth.

Make it a Family Affair

Even though you may be the adult in this situation doesn’t mean all of the cleaning should be all you responsibility. Get your little one involved. This will not only teach him or her how to pick up after themselves, but it’s also just plain nice to have some help.

For more information about cleaning supplies and the benefits of cleaning with quality sponges, visit Spongeoutlet.

Know Your Cleaning Products

cleaning products microfibercloth scrub sponge and instant eraser eraser sponge

Let’s face it. Life is full of little messes and you need the proper tools for cleaning them up. But with so many cleaning products to choose from, how do you know which will work best for your particular situation?

We’ve highlighted a few of our best-selling products below to help you narrow it down.

Microfiber Cloths- Gentle and Versatile

Made from synthetic materials, microfiber cloths can be used for many different applications including cleaning smooth and delicate surfaces. They are tough enough to soak up dirt and oil yet they are soft enough that they can be used forcefully without creating scratches.

When you aren’t using them for dirty messes, microfiber cloths are great for dusting because they naturally attract dust with their electrostatic properties. They can also do great things for stainless steel surfaces, windows, antiques, and other sensitive surfaces. They are also great for polishing mirrored or reflective surface and can really make them shine.

To remove and capture dust, try slightly dampening them with water before dusting to make sure that dust is collected by the cloth and not just disturbed on the surface or moved into the air.

According to experts, microfiber towels should not be washed with other items of your laundry in order to avoid cross-contamination with dirt, dust and leftover cleaning agents.  Also, these cloths are highly sensitive and easily attract lint and stick to other cotton fabric items. Washing the towels only with other microfiber towels should prevent them from gathering lint and sticking to other laundry items.   Do not use bleach,  fabric softeners, detergents with added fabric softeners,  or highly-fragrant detergents to clean your microfiber towels because it will cause the cloths to be less effective at cleaning. Air dry or tumble dry on a low or no-heat setting to prevent the looped fabric from becoming damaged from heat. Do not use dryer sheets when drying your microfiber towels as the sheets can coat the fabric with fabric softener and make the towels less effective at cleaning.

Eraser Sponges – A Cleaning Product with So Many Uses

If you think that all sponges are the same, then you have never used the miraculous eraser sponge. This water-activated tool works on a variety of surfaces and can clean just about every form of filth. With just a bit of water, it can clean walls, floors, and other surfaces. Crayons, pencil marks, dirt, grime, and scuff marks are no match for the eraser sponge; it’s like magic!

The Instant Erase sponge is also available in an extra strength melamine eraser sponge which makes quick work of the harshest grease, grime and baked-on stains. The extra strength eraser sponge is compressed to give it lasting cleaning. It also has a textured surface to help it clean grout lines on tile or remove tough stains.

To clean an eraser sponge, just rinse the sponge under water to remove dirt. Sometimes you have small and very dirty jobs, like removing mud from the soles of a sneaker. For small dirty jobs like this, you can cut the sponge into a smaller piece, do your cleaning and then dispose of the dirty sponge afterwards. This also helps stretch your supply of sponges and the new shape might help it reach into corners and small areas.


Scrubby Sponges For Tough Jobs

Our scrubby sponges can do wonders for everyday general cleaning, from simple to tough. This sponge works great with typical spills including those on bathroom surfaces, countertops, and more. The coarse, hard scrub surface can also help clean tough dishes or grease soiled kitchen surfaces.

Some of our scrubby sponges have both a cellulose side and abrasive side so they can handle just about any cleaning needs.

If you are worried about cleaning delicate surfaces, look for our non-scratch scrub sponges, like the Instant Erase Super Star Scrubby Sponge.

After many cleanings, sponges can sometimes smell. To prevent this, make sure you rinse them after use and allow them to dry out. You can also toss your sponge into the top rack of your dishwasher for easy cleaning .

Cleaning Product Tips

Before using any cleaning product, it’s always wise to test the product on an inconspicuous spot on the surface you plan to clean. Do this first before using the cleaning product on the entire surface. Look for scratches or dulling of the surface before you continue to clean.

You do not always need to deeply clean your cleaning tools between uses, but a quick rinse and thorough dry will help extend their lifespan and keep them working effectively. For example, you do not always need to wash your microfiber towels in the washer after each use. In between washings shake out your microfiber towel over or inside a trash bag  to catch any loose dirt or dust and  rinse under water to remove any remaining dirt. Allow the towels to air dry and they are good for another round of cleaning.

If you store your cleaning supplies together, colors can sometimes help you remember which towels are used on what surfaces. You would not want to use the same sponge to clean your kitchen that you use to clean your bathroom, for example. By color-coding your cleaning supplies, this help prevent any cross contamination.

Spongeoutlet is the leading online distributor of bulk melamine eraser sponges, microfiber towels, dusters, mops, and other essential cleaning supplies.

Keep Cool with Sponges this Summer

With summer on the horizon, before you know it temperatures will be rising to a sizzle. Being in the scorching sun without any relief can be taxing. However, what better way to have some fun in the sun than keeping cool with your own do-it-yourself project.

Sponge water bombs are not only reusable and environmentally friendly, but also easy-to-make and a fun alternative to water balloons.

You can get started today on this fun addition to incorporate into your summer routine.

We’ll walk you through what you’ll need, and how to make these DIY water bombs.

Supplies:

Note: These instructions make 19-22 DIY sponge water bombs. Feel free to alter instructions based on your needs.

Tools:

  • Pliers
  • Scissors
  • Dremel Tool

Instructions:

  1. Cut each sponge into 7-8 pieces along the shorter side of the sponge. Try to keep the width of each piece the same for each piece to maintain uniformity.
  2. Stack three pieces of sponge on top of each other. Add two more rows of 3-stacked pieces. You should now have nine pieces, stacked three by three.
  3. Pinch the center. Then, wrap the center of the 9 pieces with a zip tie, making sure the grooved end is facing the sponge pieces.
  4. Using pliers in your other hand, pull the zip tie to make it as tight as possible. The tighter, the better.
  5. Cut and remove excess plastic from the zip tie. Sand down any sharp points using a dremel tool.
  6. Now, it’s time to shape your sponge water bombs to be more round. Fluff and twist the sponges accordingly.
  7. Dip in water and have some fun!

Cleaning Instructions:

One huge perk of these sponge water bombs is that they are reusable, so the fun doesn’t have to stop after just one use. The bombs are dishwasher-safe. Another option is to dilute ¾ cups of bleach to each gallon of water in a bucket and soak the bombs in there.

This DIY craft originally appeared on Muslin & Merlot.

For more information on other uses of sponges, visit the Spongeoutlet.

Cleaning Walls can Preserve Home

When you’re working through your to-do list for cleaning your home, you probably have countertops, bathrooms, and floors towards the top of the list.

However, cleaning your walls is an important part of home maintenance that you should be doing at least once a year.

A simple swipe of a vacuum likely isn’t enough especially if you’re cleaning a high-traffic room.

Take a look at the walls in your living room or kitchen, especially near doorframes and light switches.

  • If you haven’t cleaned these walls in some time, you’ll probably notice a significant amount of dust and dirt building up.

Whether you are planning to spot clean latex-painted walls or do a floor-to-ceiling wipe down, the first step is to mix a few drops of dish detergent in with some warm water. Use an eraser sponge to clean, lightly scrubbing the area.

  • Make sure to watch for dripping: if you don’t evenly apply water to the paint, it could cause discoloration.

For oil-based paints, you can add a mild de-greaser into to the detergent and water mixture. Follow the same steps, and use a gentle microfiber cloth to wash.

If you have stubborn spots that need a little extra attention, our eraser sponges should be able to eliminate them. Remember that if you rub too vigorously, you could remove some of the paint. Be careful to scrub in gentle circular motions to remove stains.

Even though washing your walls isn’t something you may think to do often, taking care of the paint on your walls will prevent long-term, hard-to-get-out stains and help maintain your home and paint.

Looking to purchase eraser sponges, or other products, for your next cleaning job? Visit Spongeoutlet.

Tips on Cleaning Out Your Oven

Spring is in the air and many of us are working through our spring cleaning to-do list. If you are starting to tidy up around your home, don’t forget to add your oven to the list.

Many people don’t clean their ovens as frequently as they should, so make sure you don’t neglect it this spring. Here are some tips for cleaning your oven do you can start the spring season with a clean oven and some peace of mind.

Skip Harsh Chemicals

All you need to get your oven clean is white vinegar and baking soda. This simple mixture, which you can make at home, will save you hundreds on cleaning solutions, and works wonders to get rid of grease and grime, according to Daily Mail. Mixing vinegar with baking soda creates a foamy mixture; let it sit on greasy spots for 30 minutes, and then use our scrubby sponge to scrub it clean.

Don’t Skip the Shelves

You can’t just clean the walls of your oven to make it sparkle again: you need to clean the shelves, too. One easy way to do this is to remove the shelves from your oven, place them in a sealable plastic bag, and spray them with oven cleaner or your baking soda mixture. Let them soak for 30 minutes, and rinse, using one of our gentle microfiber towels.

Get Rid of Smells

If you use your oven often, you probably notice that it develops some strange smells between cleanings. To get rid of smells, use an oven-safe bowl filled with water and a few drops of vanilla or citrus extract. Place the bowl in the oven, and slowly heat the oven for about an hour.

For more cleaning tips, check out our blog and visit Spongeoutlet for the products you need to get your oven clean this spring.

Items that Rarely Make Spring Cleanings Lists

If you’re committed to spring cleaning, you probably have your “to-do list” made up. Many of us focus on scrubbing the floors we often neglect, clean hard to reach windows, and clean out that forgotten fridge shelf.

Regardless, there are some common household items that are often neglected during spring cleaning to keep in mind as you start to spruce up your home for the new season.

Wash Your Washing Machine

Your washing machine cleans your dirty clothes which means that your washing machine gets dirty often. When cleaning this spring, give some attention to the appliance that is constantly cleaning everything else. Both the inside and the outside of the washing machine can grow soiled which results in mildew, strange scents, and otherwise. Use minimal water when scrubbing the outside of your washing machine to get grime off.

Décor in Dark Places

You probably have made the bathroom a focus of your spring cleaning. It’s important to scrub out the tub, wipe out the sinks, and disinfect the toilets, among many bathroom chores. However, the details often get neglected when it comes to bathroom cleaning. If you have home décor in your bathroom, it’s important to wipe down and disinfect your décor as well. Items such as decorative soap dishes, jars, and containers need to be wiped down and scrubbed to avoid bacteria from settling in.

Careful with Cleaning Supplies

It might be easy to assume that your cleaning supplies are, well, clean. However, most of them are probably quite filthy especially if you’ve had them for quite some time. From old brooms to outdated toilet brushes, many of your cleaning supplies are probably holding onto bacteria. Before you start your spring cleaning, make sure all of your supplies are clean themselves.

Are you in need of some reliable sponges for your spring cleaning tasks? Visit Spongeoutlet, home of the eraser sponge.

Best Places to Spring Clean

The days are getting longer, and the weather is getting warmer. Yes, it’s that time of year again. Spring is upon us, and that means so is spring cleaning.

However, don’t fear. Cleaning may not come top of mind for fun things to do, but a good spring cleaning session can actually reinvigorate you and your home. It’s a great opportunity to give your home an annual deep clean and address those problem areas that you keep putting off month after month.

As you approach this year’s spring cleaning, make sure to add these areas to your cleaning to-do list, and you’ll be sure to keep your home sparkling all year round.

GENERAL CLEANING

Carpets & Area Rugs: Spring cleaning is an opportune time to shampoo your carpets and area rugs. For spot cleaning, use a carpet-safe cleaning solution and a sponge.

Windows: Add a sparkle to your home by washing your windows. Window cleaner and a sponge should do the trick. Don’t forget to wash both the interior and exterior of the window.

Walls: Spot clean your walls using a sponge and a paint-friendly cleaning solution

Bedding: Wash all your bedding, including comforters, sheets and pillow cases.

Ceiling Fans: It’s natural for a dust to accumulate on your ceiling fans. Spring cleaning is a perfect time to bust out your latter and get your ceiling fans looking like new again.

Bathroom: Give the shower tiles and bath tub a deep cleaning. A bathroom cleaning solution and a sponge will help you address tougher spots.

GIVE YOUR KITCHEN SOME LOVE

Kitchen Cabinets: Use a sponge and a kitchen cleaner to wipe down kitchen cabinets.

Refrigerator: Wipe down the exterior and interior of the refrigerator. Take out shelves and wash in the sink.

Oven & Microwave: Give your microwave and oven a deep clean. This type of routine maintenance will help keep your appliances looking and working like their brand new.

THE ART OF DECLUTTERING

Closets: Go through closets and identify old clothes and items that you can donate.

Book Shelves: Look through shelves to see if you can part with any old books, DVDs or CDs.

Garage: Spring cleaning is a good time to declutter your garage by identifying anything that you can donate as well as organizing this space.

For more information on cleaning supplies and sponges, visit Spongeoutlet.

Sponges Successful in the World of Makeup

According to InStyle, women were typically spending $15,000 in a lifetime on beauty products as of 2013. The cost of products such as foundation, mascara, blush, and many other products, adds up. Understandably, women are always looking for creative ways to save money on beauty products, and household sponges are now playing a role in that.

A vlogger (a video blogger) named Lauren Blake Lucia, recently released a video on Instagram where she used a standard household scrubby sponge to apply her makeup.

A sponge, typically used to scrub a soiled countertop or tiled flooring, was used successfully as a makeup applicator. (We’re as surprised as you are!)

Many women purchase a product called a “beauty blender” to apply their liquid makeup. This product is essentially an egg-shaped sponge that women typically pay about $20.00 for. Lucia decided to see if a household sponge might work to apply liquid makeup how this beloved product does, and the sponge did a better job than expected.

Using a Sharpie, Lucia drew out an egg shape on the sponge and cut it out with scissors. Afterwards she dipped the sponge into water to expand and soften it, and started applying her makeup.

Lucia used the soft side of the sponge, not the scrubby side, to blend on liquid foundation and concealer. The results were surprising: the makeup went on just as it should and looked as if she used a designated makeup sponge or makeup brush when she was finished.

Maybe you’re thinking that this is a good way to waste a perfectly good sponge. However, if you are someone that spends a decent amount of money on beauty products, purchasing standard household sponges is actually a more affordable option, and it would be fun to try!

Plus, Lucia also revealed that you can use the scrubby side of the sponge as a lip exfoliator which can help prepare your lips for near perfect lipstick application.

We appreciate creativity and were genuinely impressed with Lucia’s results.

If you’re looking for a new “beauty product” or a reliable cleaning sponge visit Spongeoutlet.